# Creating Repositories
## Overview
In order to store and manage your files, you'll need to create a repository. Copia has no limitation on the number of repositories you can make or the size of each repository. You can create repositories from both the Web App and Desktop App.
{% hint style="info" %}
If you are new to Git, we recommend getting started by storing a single project in a repository. It is always easier to merge repositories at a later time instead of breaking a repository apart.
{% endhint %}
## Creating a Repository (Copia Web App)
Click the *+* button in the upper right-hand corner of any page on the Copia web app. Choose the *New Repository* option.
You can also create a repository from the Dashboard by clicking the *+ New Repository* button on the repositories page.
Fill out the *Repository Name* and *Description* fields. Click the *Create Repository* button to continue.

{% hint style="info" %}
You have the option to create your new repository from a preexisting template. To learn more about how and when to use templates, check out section on [creating templates](https://docs.copia.io/docs/git-based-source-control/basic/create-a-new-repository/creating-templates).
{% endhint %}
You should be redirected to your new repository.

## Creating a Repository (Copia Desktop App)
When creating a repository with the Copia Desktop App, you can either create a new repository or add an existing, local repository.
### Creating a New Repository
Creating a new repository will create a new empty local repository folder on your system. There are three ways that you can create a new repository:
* If you have no repositories already, you may be presented with an option to *Create a New Repository on your hard drive...*
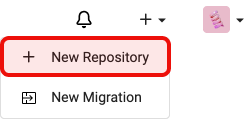
* You can navigate to the *File* dropdown \_\_ and choose the *New Repository* option
* If you have existing repositories, you can press the repository selector, press the *Add* button, and choose *Create New Repository*
Regardless of which route you take to create your repository, you will be presented a dialog where you will need to define the *Name*, *Description*, and *Local Path*. Copia recommends that you always initialize the repository with a README. After checking the option, press *Create Repository* button and your new repository folder will be created locally.

{% hint style="info" %}
You'll note that by default, Copia initializes your new repository with LFS. You can learn more about Git-LFS [here](https://docs.copia.io/docs/git-based-source-control/making-changes/binary-and-large-files#git-lfs).
{% endhint %}
### Adding an Existing/Local Repository
To add an existing local folder or repository to Copia, you can look to one of the following methods:
* If you have no repositories already, you may be presented with an option to *Add an Existing Repository from your hard drive...*
* You can select *File -> Add local Repository...*
* If you have existing repositories, you can press the repository selector, and then press the *Add* button and choose *Add Existing Repository...*
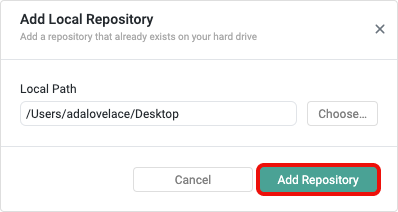
After choosing one of the above options, you will be given the option to choose the *Local Path* of the folder or existing repository.

If the folder is already a repository (perhaps it was copied from another system), simply click the *Add Repository* button.
If the folder is not already a Git repository, Copia will ask if you would like to make it a repository. In this case, select the *Create a Repository* link to continue to set this folder up as a repository.

Enter a *Name*, *Description*, and *Local Path* into the dialog. Copia recommends that you always initialize the repository with a README. After checking the option, click *Create Repository* button.

{% hint style="info" %}
It is not recommended to store repositories in cloud-synced folders such as Google Drive or OneDrive
{% endhint %}
Your initialized repository should be viewable in the Desktop App. At this point, the new repository is only on your local machine and it is not registered in Copia's server. To push the repository to remote, you will need to click either of the *Publish Repository* buttons.

## README files
### What is a README file?
A README.md file is a "markdown" formatted file, and is the first place someone looks to understand the purpose and contents of a repository. Its name literally means *“read me first.”* No matter what the repository contains, whether it’s a single project, a collection of related work, an area of equipment, or even just reference materials, the README file provides essential context so others can understand and use it effectively.
### Why a README file matters
A README file is beneficial in many ways, including:
* **Centralized Documentation**\
Instead of hunting through emails, local notes, or outdated documents, the README provides a single, version-controlled place for the most important repo details.
* **Faster Onboarding**\
New engineers, technicians, or partners can quickly understand the scope of a repo without needing lengthy handovers.
* **Reduced Risk of Errors**
\
Documenting things like firmware versions, hardware configurations, and change procedures minimizes mistakes and downtime when updates or fixes are required.
* **Consistency Across Teams**
\
By adopting a standard practice for READMEs, organizations ensure that repos are documented in a predictable way, regardless of who built or maintains them.
### What to Include in a README
Depending on the type of customer and project, a README file might include:
* **System Overview**
* Number of PLCs in the project or area
* Controller firmware and version details
* Hardware configuration (network topology, IP addresses, modules used)
* Images of machines, panels, or key hardware
* **Operational Guidance**
* Standard Operating Procedures (SOPs) for making changes in Copia
* Guidelines for branching, committing, and reviewing code
* Links to relevant internal or customer documentation
* **Project Context**
* Which customers are using this machine or system
* Customer contacts, vendor contacts, and support references
* Known limitations or design considerations
* **Collaboration Tools**
* Notes on how to request or review changes
* Instructions for integrating with ticketing or issue tracking systems
* References to related repositories or libraries
### Value of a README
A README isn’t just for the present members. Over the lifecycle of an area, machine, project or system, often spanning years staff may change, upgrades will occur, and systems will expand. Maintaining a README ensures that future engineers will have the context they need to understand past decisions and make informed improvements.